


After seeing a lot of doily ideas around (on blogs and on Pinterest) I felt inspired to create my own. Who wouldn't be inspired after pinning all this goodness:


1. source via Melissa Misco on Pinterest 2. source via C on Pinterest 3. source via Allison Michelena on Pinterest 4. source via Angela Redding on Pinterest 5. source viaSolveigg Grimstadd onPinterest
Here's my version of doily art:


Wanna make your own? This project will take a day or two to complete, but it's can be a really inexpensive, interesting option for wall art if you find your canvases on sale, find doilies at thrift stores or in grandma's attic, and use scraps for the ruffles.
Let's get started.
Paint the canvases.

Paint your canvases in long even strokes. Let dry.

I have a tendency to dive into projects without researching them sometimes to find the best way to do them. Instead, I come up with my own way and it sometimes works out as planned and other times it doesn't. My original idea to make this art was to paint the backs of the doilies and print them onto the canvas, but the picture above is what I got. Since that paint mess was already on my canvas and I didn't want to start over or fix it, I decided to go a different route: paint all the doilies and adhere them to the canvas. I simply put one doily on top of the painted part. You can hardly tell.

Next position your doilies where you want them to go. I did this before I painted so I would know what colors I'd want to paint the doilies.
Paint the doilies.

The easiest (and messiest) way to get your doilies painted is to put a large amount of paint onto some cardboard and press the doily into the paint with your hands. Then pick the doily up and pull it apart and press the paint into the crevices of the fabric. Your hands will be seriously a wreck. Then let doilies dry. I let mine dry overnight since they were soaked in paint, but it may take just a couple hours.
The doilies could also be dyed, but I used what I had on hand instead of going to buy dye once the direction of my project had changed. Since I already had the paint, it worked for me. I liked how the paint hardened the doilies, too, so I probably wouldn't change it if I did this project again.
Mod Podge the canvas and the doilies onto the canvases.

Get out your Mod Podge and paint the canvas in even strokes for a nice glossy finish on the canvas. Let dry.

Now we're going to adhere the doilies to the canvas. Paint both sides of each doily with Mod Podge. The layer under the doily will adhere it to the canvas and the layer on top will give the doily a gloss.

You'll probably get puddles of Mod Podge in the holes so simply dab it out with the brush.

Be sure to smooth the Mod Podge around the doily, too.
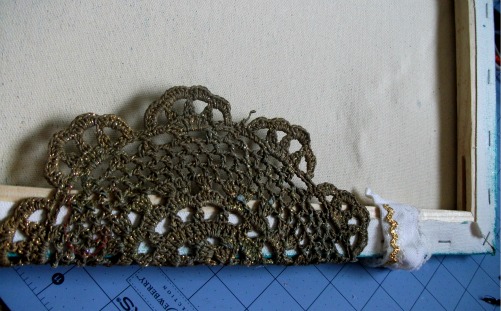
I placed some doilies so they would hang off the edge. When you do this, simply adhere them like you did the rest except let them wrap around the side and then the back as shown here:

Let all doilies dry. Again, I believe I let these dry overnight, but it may not take that long.

You can stop here. But I felt mine needed a little extra something so I made some ruffles. Ruffles are always the obvious choice when you need a little something.

Make the ruffles and glue to canvases.
To make your own ruffles and add them to your art, read on.

Cut strips of fabric about 2 inches wide. Follow directions on the Fray Stop can and spray both sides of all fabric strips.

Then press the strips in half leaving about 1/4 an inch peaking out at the bottom.

Since you've already sprayed your strips with fray stop they will stick together after pressing. Simply run your finger through to separate layers.
When you sew the ruffles, stitch along the fold. Your ruffles will look like this:

Use hot glue to glue the ruffles where you want them.

Do not cut the threads from your ruffles until it is completely glued down.

To layer the ruffles, I placed the top one on first and then lifted it up, drew a line of glue underneath for the next ruffle. By doing it this way I can plan where the ruffles should be as I go.

Even though you sprayed your fabric with fray stop you'll probably get this mess. That's okay. Just snip it off once that set of ruffles is glued on.

Keep adding ruffles until you're satisfied with the look.

If you want your ruffles to go off the sides of the canvas, glue them to the sides only as you go, not the back until you're finished with with the whole set of ruffles.

Your canvas will look like this on the back.

When you're done with that set of ruffles, glue the ends to the back and trim the edges.


Stand back and enjoy. :)
These canvases are going in my guest bathroom to spice up the plain white walls that have been there all year that we've lived here!
Hope you enjoyed the tutorial.
I'd love to see yours if you make any! You can upload them to my flickr group or just email me!
Thanks for reading.
Linking here.

6 comments:
Oh my gosh, that is the cutest idea! Thanks so much for sharing, I will definitely have to try it sometime! I found your blog over at Vintage Wanna Bee link up today, so glad I did, I love your blog! Would love for you to stop by my blog sometime :) rolleduppretty.com
Keep making cute stuff!!!
Savannah
Love it!!! I love doillies :)
I´ll feature on my blog. Hope you don´t mind.
I´m a new follower and Loved your tutorials.
Thanks for sharing
hugs from Brazil
Thats so pretty!! :)
Very sweet and pretty! I'm a new follower!
Brie from darlingdoodles.blogspot.com
I'm a big doily fan. These are very sweet.
This is such a fun project, LOVE the colors!
Post a Comment